A lot of satellites typically have beacons, interesting data transmitters or transponders that can be received or used by radio amateurs. Knowing when and where the satellites are passing overhead is essential. Flyby, through its companion library libpredict, is a software package for estimating such satellite positions. See also: Development of flyby and libpredict.
Exact calculation of the position of the satellites in complicated gravitational fields is very difficult, so simplified perturbation models are generally used. The exact position and other parameters of the satellite is measured (typically by NORAD) at a given time (epoch time). These properties can then be estimated at other times by using a simple gravity model for earth, and including the more complicated gravitational effects from earth and deeper space using perturbation theory. Given updated parameters and “small” time differences from the epoch time (less than a couple of weeks is probably good enough), we can generally predict the position of the satellite to a high enough accuracy that we can point our antennas towards the predicted position and expect the satellite to be there. The set of measured parameters (after being crunched through a related model) is called a TLE, while the prediction model is called SGP4/SDP4. The details on this are not really that important, you can generally assume that a TLE corresponds to a satellite, and that it can be used to calculate a time-dependent position using the appropriate prediction software.
The satellite is speeding overhead while we are approximately standing at rest. The electromagnetic waves transmitted by the satellite will therefore be doppler shifted when we receive them. The satellite transmits at a specific frequency known a priori, but the received frequency is shifted significantly and will change continuously as the satellite passes overhead. The satellite will experience the same thing with respect to our transmitted frequency if we are transmitting anything towards it. Without proper correction of our transmitted signal, the satellite might not even receive anything within its fixed frequency range. In addition to pointing the antenna in the right direction, it is therefore important to also adjust the frequencies correctly. Flyby does both, using the satellite prediction library libpredict, and can automatically communicate the frequency and position changes to a rig and antenna controller using hamlib.
This post will outline the steps involved from compiling Flyby to tracking satellites.
UPDATE, 2017-06-08: An up to date version of the usage guide is now located in the source code repository. This version will be kept up to date and reflect the current state of flyby, while the information in the blog post below can be considered out of date.
If the URL above for some reason should be dead, the README file in the root of the repository should always contain an URL or pointer towards the correct source of the information.
Note on Windows
From here and on, this guide will assume that you are using GNU/Linux or an operating system with similar functionality. The software will probably work also on Windows if you use Cygwin or similar. Without Cygwin, you would probably have to edit the source code manually to enable Windows’ version of BSD sockets (unless mingw32 supports “normal” sockets, which it actually very probably does), and I have no idea how you would install or use ncurses. Libpredict might work out of the box, given that the used time-functions were not too unorthodox. Challenge: Build this on Windows and report the compilation errors in the comment field.:-) Instead of make, use mingw32-make.exe.
Building flyby and libpredict
Flyby has to be built from source. But before that, libpredict has to be built and installed. You can either install libpredict to a system-wide directory, or you can tweak your library paths when compiling flyby.
Dependencies for libpredict and flyby include CMake and a compiler, while Flyby also requires ncurses. These are installed on a Debian-based system using e.g.
# apt-get install libncurses-dev cmake gcc make
libpredict is compiled and installed to system-wide paths using
$ git clone https://github.com/la1k/libpredict.git
$ mkdir libpredict/build; cd libpredict/build
$ cmake ..
$ make
(...)
# make install
# ldconfig
Similarly, for flyby:
$ git clone https://github.com/la1k/flyby.git
$ mkdir flyby/build; cd flyby/build
$ cmake ..
$ make
Hard mode: If you didn’t install libpredict to a system-wide path, you can specify where gcc should look for the library files using:
cmake -D CMAKE_C_FLAGS="-L [your libpredict install path]/lib/ -I [your libpredict install path]/include" ..
Flyby can also be installed to a system-wide path using make install.
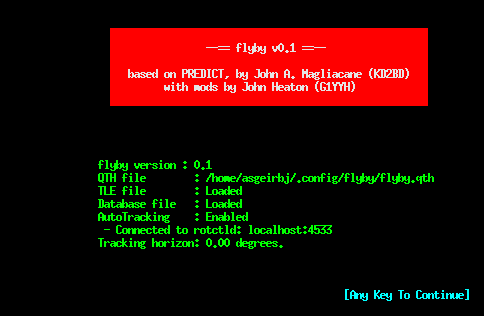
Running flyby for the first time
After a successful build, we can try to run flyby for the first time by navigating to the build directory and running ./flyby. This will hopefully result in a screen similar to this:
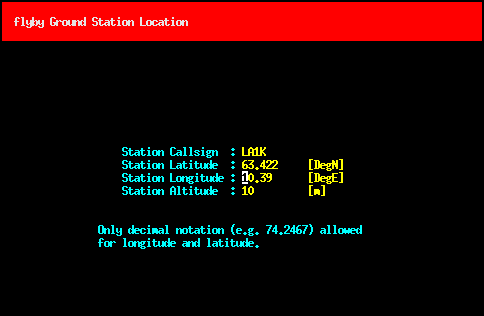
Here, you can input your coordinates so that flyby calculates correct satellite coordinates relative to your antenna. Station callsign is not used for much else than being printed in the multitrack view. You can enter whatever you want, your callsign, your dog’s name, your mother’s name.
Tip: After exiting the screen, flyby will generate a config file in ~/.config/flyby/flyby.qth. Flyby normally defaults to empty callsign and zeroes for all coordinates, but if this file also is copied to /etc/xdg/flyby/flyby.qth, it will function as a default for new first time runs of the application. This can be convenient on a multi-user system where all users anyway would use the same set of coordinates.

This is the screen that you will be greeted by when running flyby, and normally displays all satellites that are enabled. As no satellites are enabled, it is empty and suggests that you type ‘w’ to enter the menu for enabling satellites.
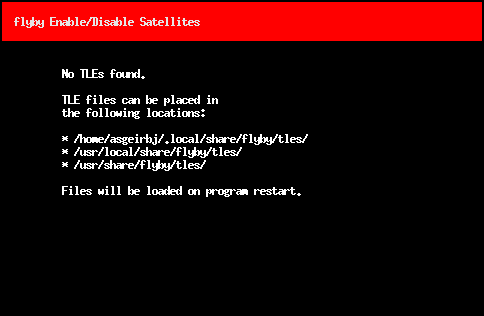
This is also empty, however, as we have defined no TLEs and flyby doesn’t ship default TLEs. We therefore have to download TLEs. Next step: download TLEs.
Obtaining and updating TLEs
A nice source for updated TLEs is the following URL: http://www.celestrak.com/NORAD/elements/. These are updated regularly. As a set of parameters to a perturbation model around a time t0, TLEs have a limited numerical validity far from the start time. They therefore have to be updated regularly in order to obtain accurate predictions. A script is supplied with flyby for easing this update process (update-tle), but will only update TLEs that already are present in the database. Any new entries in the text file is ignored.
We can add a set of new TLEs by running in a terminal:
wget http://www.celestrak.com/NORAD/elements/amateur.txt -P ~/.local/share/flyby/tles/
This will download a package with amateur radio-related TLEs to our local TLE directory. Running flyby again and navigating to the ‘W’ submenu will result in this screen:
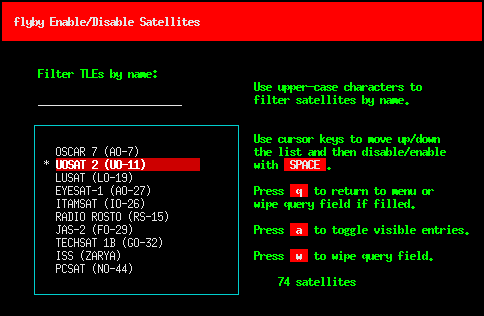
The default is that no satellites are enabled for display. We have to enable satellites.
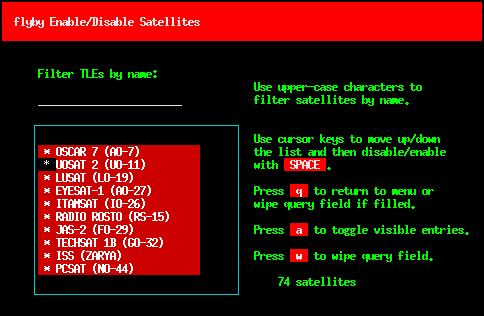
We can enable all satellites in the database by typing ‘a’. Alternatively, more advanced selection can either be done manually or by entering a search term with CAPITAL LETTERS and selecting or deselecting either manually or using ‘a’.
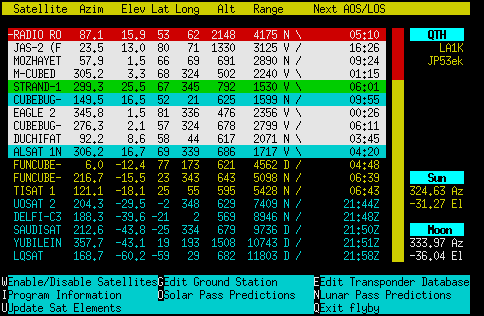
Back in the multitrack view, we have a color-coded overview over all our enabled satellites. On the top, with colored backgrounds, are the satellites that currently are passing over our horizon. The times shown to the right are the minutes and seconds until the satellites finish their passes. The rest of the satellites are sorted by the time left until the next time they pass over our horizon, either displayed with the number of minutes until AOS or the absolute UTC time if too far away. At the bottom (use page down or hold in your down arrow button) you will find satellites that never will pass over your horizon.

We will try out the single track mode. Press either right arrow button or ENTER and select ‘Track satellite’.
(Tip: ‘T’ enters single track mode directly, like for the main menu in original predict.)
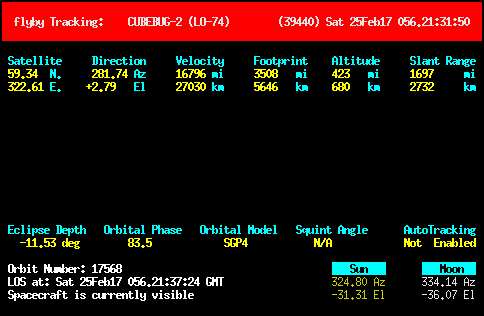
Now, a screen is shown containing almost exactly the same information as in the previous multitrack view. Here, however, we have some additional features available for controlling antenna rotors and radio rigs.
(“Spacecraft is currently visible” means that you generally could see something like this. This is also probably the purpose of the “predict visible passes”-option from the last screen. It means that the sun is shining on the satellite, and the sky is dark enough for you to potentially see the reflection.)
Tracking your first satellite
We will first define some transponders for the satellite we want to track. This is not strictly necessary for antenna rotor control, but it is nice to show this in relation with the frequency information. Transponders are defined using the transponder editor:

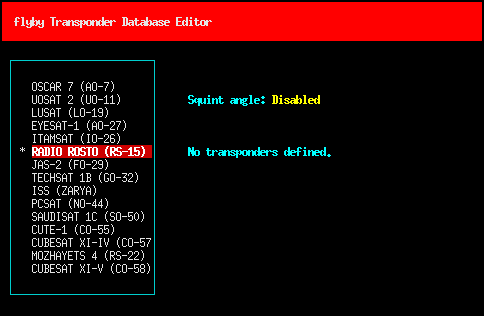
We arrive in the transponder database editor (also accessible from the main menu by pressing ‘E’). We have no transponders defined. We now define transponders.
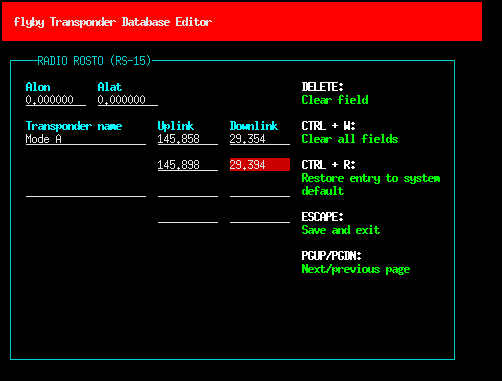
Information we can find on the Internet is typed into the fields (typically search for satellite name + transponder, or beacon). The two fields for uplink and downlink, respectively, indicate start and end of a frequency range. One of them can be left blank.
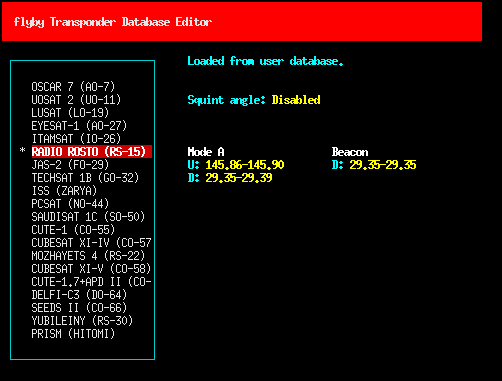
Tip: Entering transponder entries is cumbersome. The database is generated in ~/.local/share/flyby/flyby.db, and can be installed system-wide by copying to /usr/{local/}share/flyby/flyby.db. All users can then enjoy the availability of this transponder database. If we at some point compile a more complete transponder database, it would probably be nice to provide it as a default in the flyby repository. The old, default transponder database provided by predict is placed in the flyby repository under default/flyby.db, and could serve as a starting point.

Going back to the single track mode, we suddenly get a lot more information on the transponders and their current, doppler-shifted frequencies. This information can be powerful when we enable tracking of an antenna and a radio.
Enabling hamlib in flyby
Flyby is hamlib-enabled though a socket against rotctld and rigctld. Flyby can separatedly control a downlink and uplink VFO of a rigctld-controlled rig. To demonstrate this, we will start rotctld and rigctld sessions using dummy devices by applying these commands on two separate terminals:
rotctld -m 1 -vvvvvv
rigctld -m 1 -vvvvvv
We can follow the verbose output of each command to verify that our dummy antenna is rotated and that the dummy rig has its frequency changed. In a production situation, the number 1 would be replaced by the corresponding model numbers of your rig or antenna. For example, for an IC9100 rig and a SPID rotor controller, this would typically be rotctld -m 901 -r /dev/ttyS0 -C az_resolution=2 -C el_resolution=2 and rigctld -m 368 -r /dev/ttyUSB0.
To enable rotctld support, we restart flyby using
flyby --rotctld-host=localhost
Other hostnames can also be defined if rotctld is running on a separate host. The default port 4533 is assumed, but can be changed using the --rotctld-port option.
In the main menu, we can type ‘i’ to show the screen above, and verify that flyby has connected to rotctld. When we started flyby, we could also have defined a number in --rotctld-tracking-horizon. This can be useful for making flyby start tracking the satellite and prepare the rotor array in the correct direction in advance of the actual AOS of the satellite. This is the “Tracking horizon” shown above.
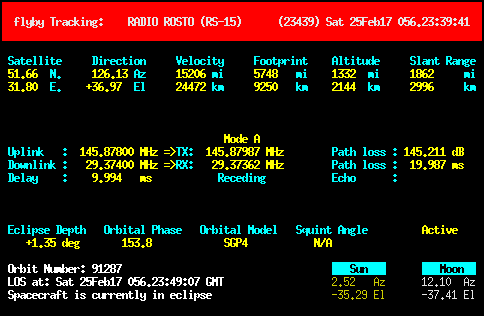
We can also notice that “Autotracking disabled” has now changed to, in this case, “Active” in single track mode. If the satellite had been below the horizon, it would have shown the text “Standing by”. The output of rotctld should now show position changes as the satellite is passing over the horizon.
If we restart flyby using
flyby --rotctld-host=localhost --rigctld-downlink-host=localhost
we should be able to see that the frequency in rigctl also is changing according to the calculated doppler shift of the transponder. Some keyboard shortcuts for frequency operation are available in single track mode:
- Key left/key right or +/- key switches the tracked satellite
- Space switches between the transponders
- Key down/key up/</>/,/. further shifts the doppler-shifted uplink/downlink frequencies
- d/D and u/U turns on/off downlink/uplink updates (f turns on both)
- F reads frequency once from rigctl
- m/M turns on/off automatic frequency reading from rigctl
- x reverses VFO of downlink/uplink
Unfortunately, these shortcuts are not intuitively displayed in the software as of yet.
More options for rotctld and rigctld operation can be reviewed using
flyby --help
A uplink VFO can be added using --rigctld-uplink-host=localhost.
Using flyby with rigctld and rotctld will probably become less obscure at some point in the future. It should for example not strictly be necessary to specify this among the command line arguments, flyby should be able to detect the availability of rotctld and rigctld on the localhost automatically, and provide command line options for potentially disabling the support if desirable, or even do this in-program. Exact operation might be subject to change in the future.
This concludes the basic guide for tracking a satellite using a TLE, rotctld, rigctld and flyby.


0 Comments
2 Pingbacks